Small kitchens don’t need big budgets to function like a dream. Whether you’re dealing with limited counter space, cramped cabinets, or awkward corners that refuse to earn their keep, strategic storage upgrades can transform chaos into order without draining your wallet. The secret lies in thinking vertically, repurposing what you already own, and making every square inch count. Below are practical, tested solutions that cost less than most appliances but deliver outsized impact.
Table of Contents
ToggleKey Takeaways
- Small kitchen storage ideas on a budget can be achieved through vertical wall solutions like pegboards ($15), floating shelves, and magnetic knife strips that cost $10–20 and eliminate the need for expensive renovations.
- Maximize existing cabinet space using shelf risers, pull-out drawers, and tension rods to organize baking sheets and create hidden storage without drilling or permanent modifications.
- Transform awkward corners and dead spaces with lazy Susans ($15–25), rolling pantry carts under $30, and above-cabinet bins to reclaim storage in areas that builders typically ignore.
- Repurpose household items like cereal boxes, mason jars, shoe organizers, and ice cube trays to create custom dividers and storage solutions that cost little to nothing.
- Rolling kitchen carts ($25–120) and portable utility units adapt to different cooking and entertaining needs while providing extra counter space in tight kitchens.
- Start with one high-impact budget storage solution and layer in additional organizers as your needs evolve, prioritizing systems that work with your existing layout.
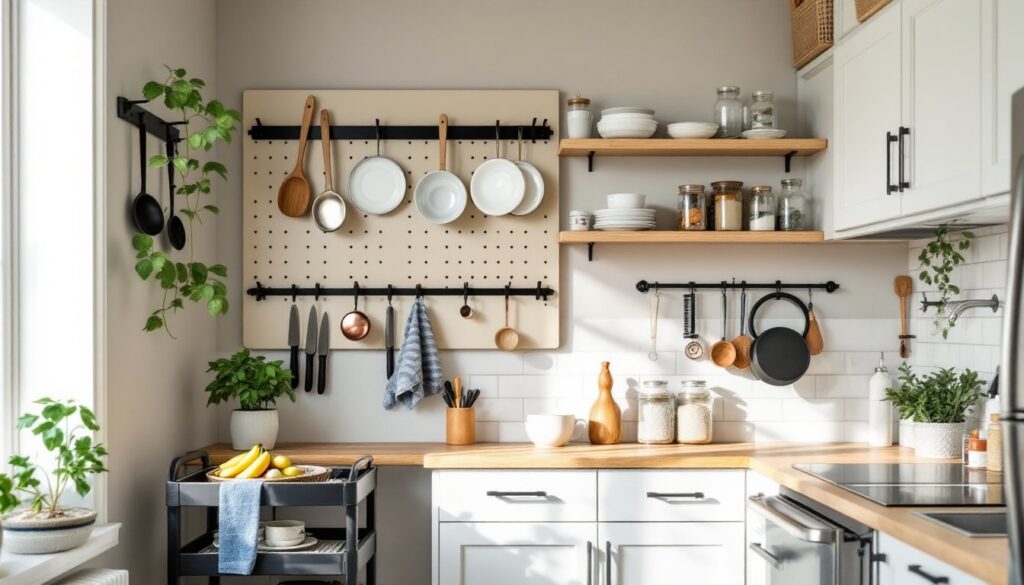
Utilize Vertical Space with Wall-Mounted Solutions
Walls are the most underused real estate in tight kitchens. Instead of letting them sit empty, install solutions that pull double duty.
Pegboard systems transform blank walls into customizable command centers. A 2×4-foot sheet of 1/4-inch pegboard runs around $15 at most home centers. Mount it with 1×2 furring strips to create clearance for hooks, then hang utensils, pots, and even small cutting boards. Paint it to match your backsplash or leave it raw for an industrial vibe.
Floating shelves add storage without the visual weight of upper cabinets. Use 3/4-inch plywood or solid wood cut to 8–10 inches deep, mounted on heavy-duty brackets rated for at least 50 pounds. Keep everyday dishes or spices within arm’s reach. Stain or seal the wood to handle kitchen humidity.
Magnetic knife strips free up counter and drawer space. A 16-inch stainless steel bar costs $10–20 and mounts with two screws into studs or drywall anchors. Position it above your prep area for quick access.
Rail systems with S-hooks let you hang colanders, measuring cups, and mugs. Install IKEA GRUNDTAL rails ($7–12 per 31-inch length) under upper cabinets or along unused wall sections. The modular accessories clip on and rearrange as needs change.
When mounting anything, locate studs with a stud finder or use toggle bolts rated for your load in drywall. Surface prep matters, wipe down walls with TSP (trisodium phosphate) cleaner before drilling to ensure adhesives or anchors grip properly.
Maximize Cabinet and Drawer Efficiency
Factory cabinets waste vertical space and hide items in the back. A few inserts and organizers fix that fast.
Shelf risers double usable cabinet height. Wire or bamboo models ($8–15) create a second tier for plates, cans, or mugs. Measure cabinet interior height first, most risers are 6–8 inches tall.
Pull-out drawers or sliding baskets bring back-of-cabinet items forward. Install under-sink organizers ($20–35) on the cabinet floor to corral cleaning supplies. For deeper base cabinets, two-tier sliding shelves ($30–50 per set) prevent the dreaded avalanche when you grab a pot.
Drawer dividers keep utensils, spices, and gadgets from becoming jumbled messes. Spring-loaded bamboo dividers ($12–18) adjust to fit most standard drawers (15–22 inches wide). For deep drawers, pegboard inserts with movable pegs let you reconfigure compartments as your tool collection evolves.
Consider corner cabinet organizers that spin or slide out to make blind corners actually functional.
Tension rods installed vertically in cabinets create slots for baking sheets, cutting boards, and pan lids. A spring-loaded curtain rod ($5–8) does the job without drilling.
DIY Organizers Using Household Items
Before buying anything, raid your recycling bin and junk drawer.
Cereal boxes become custom drawer dividers. Cut them to height, cover with contact paper or spray paint, then nestle them side-by-side to organize spice jars, tea bags, or foil rolls.
Mason jars mounted under cabinets hold screws, twist ties, or small utensils. Screw lids to the underside of shelves with #8 wood screws (1-inch length), then twist jars into place. Clear glass makes contents visible.
Shoe organizers (over-the-door fabric or clear vinyl models) hang on pantry doors to store snacks, seasoning packets, or cleaning supplies. Look for versions with 12–24 pockets that don’t require tools.
Magazine holders corral foil, parchment, and plastic wrap boxes. Mount them inside cabinet doors with command strips rated for 3–5 pounds, or screw directly through the backing into the door.
Binder clips clipped to wire shelves create hooks for chip bags or dish towels. The handles flip up to hang items, keeping counters clear.
Transform Awkward Corners and Dead Spaces
Every kitchen has odd nooks that builders forgot and homeowners ignore. Put them to work.
Lazy Susans turn corner cabinet chaos into organized spin-access storage. A two-tier turntable ($15–25) fits most 24–36-inch corner bases. Use the lower tier for oils and vinegars, the upper for spices or canned goods. Wipe down the cabinet interior and check for plumbing or electrical before installing, some corners hide supply lines.
The gap between the fridge and wall (often 3–6 inches) fits a rolling pantry cart. Build one from 1×4 pine boards and casters for under $30, or buy a pre-made unit. Sand edges smooth and finish with polyurethane to handle spills. These narrow towers slide out to store canned goods, bottles, or baking supplies.
Above-cabinet storage uses the 12–18-inch gap between cabinet tops and ceiling. Stack rarely used items in labeled bins or baskets. This isn’t code-restricted space, but keep heavy items low to avoid toppling hazards. Use a step stool with a handrail rated for 300+ pounds when retrieving items.
The toe-kick space below base cabinets (typically 4 inches tall, 3 inches deep) can house shallow drawers for baking sheets, placemats, or pet food bowls. This is advanced carpentry, it requires removing the toe-kick board, building a drawer box from 1/2-inch plywood, and installing bottom-mount slides. If you’re handy with a miter saw and drill, it’s a weekend project. Otherwise, hire a carpenter for 2–3 hours of labor.
Appliance garages keep toasters and mixers accessible but hidden. Build a simple version by adding a roll-up door or bi-fold tambour door to an existing corner of counter. Hardware kits run $25–40 at specialty woodworking suppliers.
Add Budget-Friendly Rolling and Portable Storage
Mobility beats fixed storage when square footage is tight. Rolling pieces adapt to cooking, cleaning, and entertaining modes.
Kitchen carts provide extra counter space, storage, and portability. A basic butcher-block top cart with shelves or drawers costs $60–120. Look for locking casters (wheels) so it doesn’t migrate mid-prep. Some models include towel bars, spice racks, or wine cubbies. Assemble with wood glue on joints for added stability, factory cam-lock fasteners can loosen over time.
Utility carts (the 3-tier rolling carts popular in dorms) work surprisingly well for produce, snacks, or coffee stations. Metal versions run $25–40 and clean easily. Position them in dead corners or next to the fridge, then wheel them to the table when needed.
Bar carts double as beverage stations and overflow storage. A 2-tier gold or black cart ($50–80) holds glassware, mixers, or cookbooks. Many small space storage ideas suggest using these in kitchens lacking traditional pantries.
Rolling drawer units fit under counters or tables. Sterilite 3-drawer carts ($20–30) are lightweight but sturdy enough for dish towels, napkins, or kids’ snacks. Label each drawer with a label maker or chalkboard paint.
Folding step stools with built-in storage tuck into 6-inch gaps. Models with a 2-step design and a lift-top seat ($30–50) hold cleaning supplies or reusable bags. Check weight capacity, most rate for 200–250 pounds.
When selecting casters, 2-inch locking swivel wheels offer the best maneuverability and stability. Install them with the locks facing outward for easy foot access.
Repurpose Everyday Items for Creative Storage
The best budget hacks cost nothing because you already own the materials.
Tension rods create vertical dividers in cabinets (as mentioned earlier) but also work horizontally under sinks to hang spray bottles by their triggers. A 24–36-inch adjustable rod ($6–10) needs no tools and prevents bottles from tipping.
Command hooks (the removable adhesive kind) stick to cabinet interiors, backsplashes, or appliance sides to hang measuring cups, oven mitts, or pot holders. Use hooks rated for the item’s weight, medium hooks handle up to 3 pounds, large hooks up to 5 pounds. Clean surfaces with rubbing alcohol before applying for maximum hold.
Drawer organizers don’t have to be store-bought. Cut corrugated cardboard or thin plywood into custom dividers that fit your drawer’s exact dimensions. Wrap edges with duct tape or contact paper for durability.
Ice cube trays store small items like spare batteries, rubber bands, or hardware. Stack them in junk drawers for instant compartmentalization.
Wine racks (the countertop or wall-mounted kind) hold rolled dish towels, water bottles, or even rolling pins. A 6-bottle rack runs $15–25 and mounts with two screws.
Curtain rings with clips hang on rods or hooks to organize scarves, aprons, or reusable shopping bags. A pack of 12 rings costs $8–12 at fabric stores.
File organizers (the metal mesh desktop kind) stand vertically in cabinets to hold pot lids, cutting boards, or baking sheets. They’re often cheaper in the office supply aisle than the kitchen section.
Several of these creative hacks started as IKEA products repurposed far beyond their original intent.
Conclusion
Small kitchens reward creativity over cash. By installing wall-mounted systems, optimizing existing cabinets, and repurposing household items, anyone can carve out functional storage without a gut renovation. Start with one high-impact change, maybe a pegboard or a rolling cart, then layer in solutions as needs evolve. The space won’t grow, but the usability will.