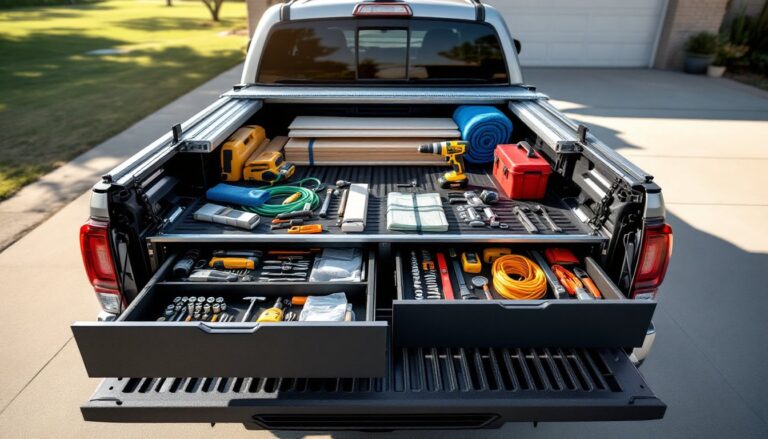
Truck beds are deceptively simple spaces, flat, open, and ready to haul anything. But without organization, that 6.5-foot bed quickly becomes a chaotic pile of loose tools, jumbled camping gear, and rolling cargo. A well-organized truck bed doesn’t just prevent frustration: it increases usable capacity, protects equipment from damage, and makes loading and unloading a breeze. Instead of buying expensive pre-fab storage systems, building custom DIY solutions allows truck owners to tailor storage to their exact needs, whether hauling lumber, towing a trailer, or weekend camping. With basic carpentry skills and common materials, anyone can transform their truck bed into a highly functional workspace.
Table of Contents
ToggleKey Takeaways
- DIY truck bed storage ideas cost 60–70% less than commercial systems ($500–$3,000+) while providing custom fit and better functionality for your specific cargo needs.
- A sliding drawer system with heavy-duty slides and sealed plywood construction protects tools and equipment while keeping them accessible from the tailgate, typically costing $200–400 to build.
- Bed dividers with integrated storage compartments maximize vertical space for small items like spray cans and tools without consuming valuable floor area, making them ideal for mixed-cargo hauling.
- Overhead racks and wheel well storage boxes capitalize on unused truck bed space, with overhead racks holding 50–75 lbs safely and wheel well boxes storing emergency supplies and recovery gear year-round.
- A modular mounting rail system with removable toolboxes and E-track tie-downs offers maximum flexibility, allowing you to reconfigure storage in seconds for different jobs or cargo types.
- Proper weatherproofing with marine-grade polyurethane, truck bed liner coating, and silicone caulk is essential to protect DIY truck bed storage from moisture and UV damage over time.
Why DIY Truck Bed Storage Makes Sense for Every Truck Owner
Commercial truck bed storage systems run $500 to $3,000+ depending on features and materials. Building custom solutions cuts costs significantly, often by 60-70%, while delivering better fit and function. Off-the-shelf products force compromises: drawers that don’t quite fit your toolbox dimensions, dividers placed where you don’t need them, or systems that block access to tie-downs.
DIY storage lets owners build around their specific cargo patterns. Someone hauling landscaping equipment needs different compartments than a contractor carrying pneumatic tools and fasteners. Custom builds also accommodate truck-specific quirks: varying bed widths, wheel well intrusions, and tonneau cover clearances.
Most truck bed storage projects require only intermediate carpentry skills. Basic tools, circular saw, drill/driver, measuring tape, and speed square, handle the majority of builds. Materials like 3/4-inch plywood, 2×4 framing lumber, and galvanized hardware are affordable and widely available. The projects below range from simple afternoon builds to weekend-long installations, all designed to maximize bed space without permanent modifications.
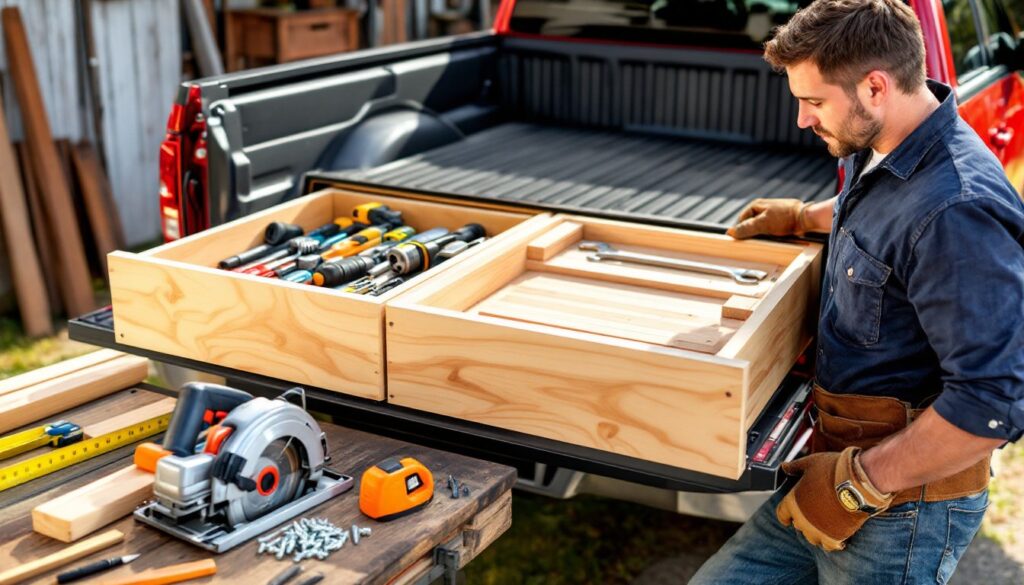
Build a Custom Sliding Drawer System
Sliding drawer systems place heavy gear at bed-floor level while keeping it accessible from the tailgate. This design works exceptionally well for tools, camping equipment, and recovery gear that would otherwise require climbing into the bed to retrieve.
Materials:
- 3/4-inch exterior plywood for drawer boxes and base platform
- Full-extension drawer slides rated for at least 150 lbs per pair
- 2×4 pressure-treated lumber for support framework
- Deck screws (2.5-inch and 3-inch)
- Exterior wood glue
- Marine-grade polyurethane or truck bed liner coating
Tools:
- Circular saw or table saw
- Drill/driver with assorted bits
- Measuring tape and carpenter’s square
- Safety glasses and hearing protection
Build Steps:
-
Measure bed dimensions carefully. Account for wheel well intrusions, bed width variations from front to rear, and tonneau cover clearance if applicable. Most short beds measure 5.5-6.5 feet: standard beds run 6.5-8 feet.
-
Frame the base platform. Cut 2x4s to create a rectangular frame that spans the bed width and extends from the bulkhead to your desired drawer depth. Secure cross-supports every 16-18 inches to prevent sagging under load. Use 3-inch deck screws at all joints.
-
Install the plywood deck. Cut 3/4-inch plywood to cover the frame. This becomes the mounting surface for drawer slides. Screw down every 8 inches along supports.
-
Build drawer boxes. Construct simple boxes using dado joints or butt joints reinforced with wood glue and screws. Drawer depth should account for slide hardware (typically losing 1-2 inches per side). Many DIYers follow plans from resources like Instructables for detailed joinery techniques.
-
Mount heavy-duty slides. Full-extension slides rated for 150-200 lbs ensure smooth operation even with loaded drawers. Mount one slide component to the platform deck, the other to the drawer side. Check alignment before fully securing, misaligned slides bind and wear prematurely.
-
Seal and protect. Apply three coats of marine-grade polyurethane or spray-on truck bed liner to all surfaces. Exposed plywood deteriorates rapidly from moisture and UV exposure.
Pro tip: Install D-ring tie-downs on top of the platform to secure cargo above the drawer system. This maintains full bed versatility.
This system typically costs $200-400 in materials depending on drawer count and slide quality. A two-drawer setup takes a full weekend for most builders. Expect to adjust slide alignment during the first few uses as the system settles under load.
Create a Versatile Bed Divider with Storage Compartments
Bed dividers prevent cargo from sliding during transport while creating vertical storage opportunities. Unlike simple 2×4 dividers, storage-integrated versions add shelving, tool racks, and small-parts organization without consuming floor space.
Materials:
- 3/4-inch plywood for main divider panel
- 1×4 pine or poplar for shelving and trim
- Deck screws and finish screws
- Heavy-duty hinges (if building fold-down version)
- Bed rail clamps or Quick-Fist clamps for securing long-handled tools
Construction approach:
Measure bed width at the point where the divider will sit, beds taper slightly toward the tailgate. Cut plywood to fit snugly between bed rails. The divider height should reach at least the rail height: taller dividers (up to 24 inches above rails) offer more storage but affect rearward visibility.
Attach 1×4 shelving to one or both faces of the divider. Shallow shelves (3-4 inches deep) hold spray cans, gloves, and small hardware without protruding excessively. Add tool clamps or PVC pipe holders for shovels, rakes, and fishing rods.
Secure the divider using removable bed rail stake pocket mounts or through-bolt it to bed anchor points. Avoid permanent drilling unless the truck is dedicated to specific work. Some builders create fold-down dividers using heavy-duty hinges, allowing the system to collapse when hauling full sheets of plywood or drywall.
For trucks that haul mixed cargo, lumber one day, camping gear the next, this represents one of the most practical storage solutions for small spaces within the bed. The vertical orientation preserves floor area while organizing frequently used items.
Cost: $60-120 depending on features. Build time: 4-6 hours including finishing.
Install DIY Overhead Storage Racks
Overhead racks capitalize on unused airspace between the bed floor and tonneau cover or truck cap ceiling. This approach works particularly well for light, bulky items: camping chairs, fishing rods, lumber offcuts, and ladder sections.
Materials:
- 1-inch square steel tubing or 1.5-inch EMT conduit for frame
- U-bolts sized to bed rail diameter
- Expanded metal or cargo netting for deck surface
- Rubber edge trim to protect stored items
- Spray paint (rust-inhibiting) or powder coating
Design considerations:
Racks must clear tonneau covers (typically 4-6 inches above bed rails) or fit within truck cap height. Most designs suspend the rack 8-12 inches above the bed floor, leaving space for larger cargo below.
Create a simple ladder-style frame using steel tubing or conduit. Width should match the inside bed measurement: length depends on cargo needs but typically spans 36-48 inches. Many workshop project tutorials provide detailed welding plans for steel versions, though conduit versions can be assembled with compression fittings and require no welding.
Secure the rack using U-bolts clamped to bed rails or bolted through existing stake pockets. Test weight capacity before loading, most DIY overhead racks safely hold 50-75 lbs when properly anchored.
Cover the frame with expanded metal (for ventilation and drainage) or marine-grade cargo netting (lighter and more flexible). Add rubber edge trim wherever cargo contacts metal to prevent scratching and rattling.
Safety note: Overhead storage shifts the truck’s center of gravity. Avoid top-heavy loads, especially on lifted trucks or when towing. Secure all cargo with ratchet straps or bungee nets to prevent shifting during hard braking.
Cost: $80-150 for materials. Build time: 6-8 hours including painting/coating.
Construct a Wheel Well Storage Box
Wheel wells create awkward voids that waste 15-20% of bed floor space. Custom-fit storage boxes fill these areas with compartments perfect for jumper cables, tow straps, tie-downs, and emergency supplies.
Materials:
- 3/4-inch plywood for box construction
- Piano hinge or heavy-duty lid supports
- Weatherstrip foam for lid seal
- Stainless steel latches
- Truck bed liner coating or exterior paint
Build process:
-
Template the wheel well. Use cardboard to create a precise template of the wheel well profile. Wells vary significantly between truck models, some are nearly square, others deeply curved.
-
Cut box panels. Transfer the template to plywood and cut panels for the bottom, sides, back, and lid. The box should fit snugly against the wheel well without interfering with tire movement during suspension compression. Leave at least 2 inches clearance.
-
Assemble with waterproofing in mind. Use exterior wood glue and deck screws at all joints. Apply a generous bead of silicone caulk along seams before assembly. These boxes sit in areas prone to water intrusion.
-
Install the lid. Attach using a piano hinge along the rear edge. Add gas strut lid supports for easier access, digging through a box while holding a heavy lid open is frustrating. Weatherstrip foam around the lid perimeter reduces water infiltration.
-
Secure the box. Through-bolt into bed anchor points or use heavy-duty L-brackets secured to the bed floor. The box must not shift during cornering or emergency maneuvers.
-
Finish thoroughly. Coat all surfaces with truck bed liner spray or multiple coats of exterior paint. Wheel well boxes experience extreme temperature swings and constant moisture exposure.
Many builders reference detailed plans from sites like Fix This Build That, which offer dimensioned drawings for popular truck models. Expect to spend $50-80 per wheel well box and about 4-5 hours per unit.
These boxes shine for long-term storage of items that must stay in the truck permanently. Unlike bed-spanning systems, they’re compatible with full-bed cargo loading.
Design a Modular Toolbox and Cargo System
Modular systems combine removable components, toolboxes, cargo bins, and mounting rails, that reconfigure based on job requirements. This approach offers maximum flexibility for truck owners who alternate between work and recreation.
Core components:
Mounting rail system: Install 1.5-inch square aluminum tubing or 80/20 extruded aluminum along the bed sides, secured through stake pockets or bed bolts. These rails accept clamps, slides, and mounting brackets that secure individual modules.
Toolboxes and bins: Build plywood boxes in standardized widths (12, 18, or 24 inches) that slide onto the rail system. Add handles for easy removal and interior dividers for organization. Line boxes with foam tool organizers or use Kaizen foam (the pluck-and-pull variety used in professional tool cases).
Tie-down tracks: Integrate E-track or L-track systems into the bed floor or divider panels. These accept sliding tie-down rings, cargo bars, and equipment mounts. E-track costs about $3-5 per linear foot and installs with lag screws into bed wood or through-bolts into metal beds.
Removable partitions: Create drop-in dividers from 3/4-inch plywood that stand vertically in the bed, held in place by track slots or simple notches that hook over bed rails. These partition the bed for mixed cargo, tools on one side, clean camping gear on the other.
Material costs: A full modular system runs $300-600 depending on component count and hardware quality. The beauty lies in building the system incrementally, start with mounting rails and one toolbox, then add modules as needs evolve.
Benefit: Modules remove in seconds when hauling ATVs, furniture, or other large cargo that requires a clear bed. When reinstalled, everything returns to its organized place. This flexibility explains why modular systems are popular among contractors and weekend warriors alike.
Expect to invest 12-16 hours building a complete system with three to four modules. Test-fit each component before applying finishes, adjustments are easier on raw wood than after coating.
Conclusion
Truck bed storage transforms a simple cargo space into a highly organized tool that works harder and smarter. Whether building a single wheel well box or a complete modular system, DIY solutions deliver custom functionality at a fraction of commercial costs. Start with the project that addresses the biggest pain point, loose tools, shifting cargo, or wasted wheel well space, then expand the system over time. Proper materials, weatherproofing, and secure mounting ensure these builds last through years of hard use.