A cluttered garage isn’t just an eyesore, it’s wasted square footage that could be working harder. Most garages start as catch-alls for everything from seasonal decorations to power tools, but without a solid shelving plan, they quickly become unusable. The right storage shelves turn chaos into a functional workshop, hobby space, or even a place where you can actually park a car. Installing garage shelving isn’t complicated, but choosing the wrong type or skipping key installation steps can leave you with sagging shelves or wasted wall space. This guide breaks down the essential shelving types, what to look for when choosing a system, and how to install them properly.
Table of Contents
ToggleKey Takeaways
- Storage shelves for your garage maximize vertical space, protect tools and equipment from moisture, and create designated zones that reduce trip hazards and improve safety.
- Choose between freestanding units, wall-mounted shelves, or overhead racks based on what you’re storing—heavy items need wall-mounted or heavy-duty shelving, while bulky lightweight gear suits overhead storage.
- Proper garage shelving installation requires locating studs with a stud finder, using a level to mark heights, securing brackets with lag bolts and washers, and performing a load test before filling shelves with heavy items.
- Shelving materials matter: steel resists moisture better than particleboard or untreated wood, which can warp or mold in unheated or humid garages.
- Track-based shelving systems offer flexibility to adjust heights without drilling new holes, while fixed brackets are more budget-friendly but harder to adapt as storage needs change.
Why Garage Storage Shelves Are Essential for Every Homeowner
Garages handle a lot. They store tools, seasonal gear, automotive supplies, yard equipment, and overflow from the house. Without dedicated shelving, items pile up on the floor or lean against walls, making it impossible to find what you need, or worse, creating trip hazards.
Proper shelving does three things: it maximizes vertical space, protects belongings from moisture and pests, and creates designated zones for different categories of gear. A well-organized garage also protects your investment. Power tools last longer when they’re not sitting in puddles or buried under boxes. Paint cans stay usable when stored on shelves instead of directly on concrete, which can cause moisture transfer and rust.
From a safety standpoint, shelving keeps heavy items off the floor and secured at appropriate heights. That reduces the risk of toppling stacks or tripping over loose items. If you’re working on projects in the garage, accessible shelving means less time hunting for materials and more time building. Many municipalities require garages to maintain clearances for egress and fire safety, and shelving systems help you stay compliant while keeping gear accessible.
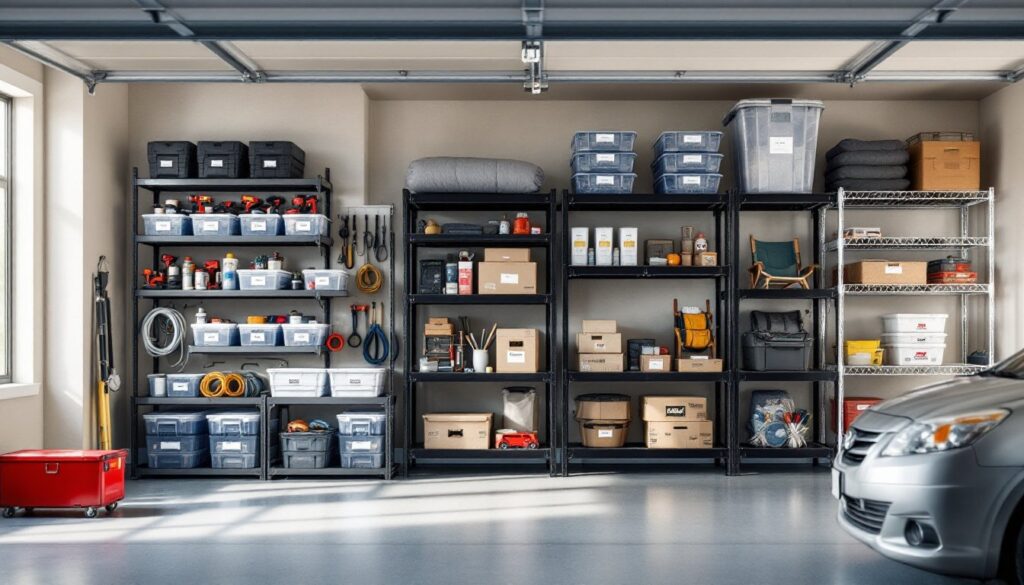
Types of Garage Storage Shelves to Consider
Not all garage shelving is created equal. The right system depends on what you’re storing, how much weight it needs to hold, and how your garage is framed.
Freestanding Shelving Units
Freestanding units are the simplest option. They don’t require wall mounting, so they’re ideal for renters or anyone who doesn’t want to drill into studs. Most are made from heavy-duty steel or resin, with weight capacities ranging from 200 to 1,500 pounds per shelf, depending on the model.
Look for units with adjustable shelves so you can customize heights for bins, tools, or bulky items. Wire shelving allows air circulation and prevents dust buildup, making it a good choice for damp garages. Solid shelves work better for small parts or paint cans that might tip through wire grids.
The downside: freestanding units take up floor space and can tip if loaded unevenly. Anchor tall units to the wall with L-brackets or corner braces, even if the manufacturer doesn’t require it. It’s cheap insurance against a collapse.
Wall-Mounted Shelves
Wall-mounted shelves free up floor space and make cleaning easier. They’re installed directly into wall studs (typically 16 or 24 inches on center in most garages) using heavy-duty brackets or a track system.
Track-based systems like those from Gladiator or Rubbermaid allow you to reposition shelves without drilling new holes. They’re convenient but can be pricier than fixed-bracket shelves. For DIYers on a budget, simple metal shelf brackets paired with ¾-inch plywood or 2×10 lumber create custom shelving at a fraction of the cost. Many beginner-friendly building guides offer free plans for DIY garage shelves that use standard dimensional lumber.
Capacity depends on bracket spacing and stud anchoring. A properly installed 48-inch shelf on three brackets can hold 100 to 150 pounds if secured to studs. Always use a stud finder and confirm placement, drywall anchors aren’t strong enough for garage loads.
Overhead Storage Racks
Overhead racks mount to ceiling joists and are perfect for bulky, lightweight items like seasonal decorations, camping gear, or empty coolers. Most systems support 250 to 600 pounds and install on 16-inch or 24-inch joist spacing.
These racks work best in garages with 8-foot or higher ceilings. You’ll want at least 16 inches of clearance between the garage door track and the rack to avoid interference when the door opens. If your garage door uses a low-headroom track system, overhead racks may not fit.
Installation requires lag bolts into joists, so a drill, socket wrench, and ladder are necessary. Many DIYers find detailed step-by-step tutorials helpful for ceiling-mounted projects. Don’t skip the step where you verify joist direction and spacing, guessing can lead to racks ripping out of drywall.
How to Choose the Right Shelving for Your Garage
Start by measuring your space. Note the wall length, ceiling height, and any obstacles like electrical panels, water heaters, or HVAC units. Measure door swing clearances and mark stud locations with painter’s tape.
Next, inventory what you’re storing. Categorize items by weight and size:
- Heavy items (paint, tools, automotive fluids): Need shelves rated for at least 200 pounds per shelf, ideally wall-mounted or heavy-duty freestanding units.
- Medium items (bins, sports gear, gardening supplies): Standard adjustable shelving works fine.
- Bulky, lightweight items (seasonal decor, camping gear): Overhead racks are ideal.
Consider accessibility. Frequently used items should be on shelves between waist and shoulder height. Rarely used gear can go overhead or on lower shelves. If you’re storing chemicals or sharp tools, install shelves above child reach and consider adding a locking cabinet.
Material matters. Steel shelving resists moisture better than particleboard. If your garage is unheated or prone to humidity, avoid MDF or untreated wood, which can warp or mold. For those managing extensive tool collections, some storage organization strategies apply equally well to home garages and larger spaces.
Finally, think about future flexibility. Track-based wall systems let you adjust heights as needs change. Freestanding units can be moved if you rearrange the garage or relocate. Fixed shelves are cheaper upfront but harder to adapt.
Installing Your Garage Storage Shelves: A Step-by-Step Guide
Before you start, gather your tools and materials. You’ll need:
Tools:
- Stud finder (magnetic or electronic)
- Drill/driver with bits for pilot holes
- Level (4-foot recommended)
- Tape measure
- Socket wrench or impact driver (for lag bolts)
- Safety glasses and work gloves
Materials:
- Shelving unit or brackets
- Lag bolts or structural screws (typically 3 to 4 inches for wall studs)
- Washers (for distributing load)
- Shelf boards (if building custom shelves)
Step 1: Locate and Mark Studs
Use a stud finder to locate wall studs. Garages are typically framed with 2×4 studs on 16-inch or 24-inch centers. Mark each stud with painter’s tape or a pencil. If you’re installing overhead racks, find ceiling joists the same way, they usually run perpendicular to the garage door.
Step 2: Plan Shelf Height
Measure and mark your desired shelf height on the wall. Use a level to draw a horizontal line across multiple studs. For multiple shelves, space them 12 to 18 inches apart for bins and tools, or 24 inches for taller items.
Step 3: Install Brackets or Tracks
If using brackets, align the top edge with your level line and drill pilot holes into each stud. Pilot holes prevent wood splitting and make screws easier to drive. Secure brackets with ¼-inch lag bolts and washers. For track systems, mount the vertical tracks first, ensuring they’re plumb, then attach shelf brackets.
Many woodworking project tutorials include tips for ensuring brackets are level and properly spaced. Double-check plumb and level before driving final fasteners.
Step 4: Attach Shelving Boards
If you’re using pre-cut shelves, drop them onto brackets. For custom shelves, cut ¾-inch plywood or 2×12 boards to length. Sand edges to prevent splinters and seal with polyurethane or exterior primer if the garage is humid. Secure boards to brackets with screws from underneath to prevent shifting.
Step 5: Load Test and Adjust
Start with lighter items and gradually add weight, checking for sagging or bracket movement. If shelves bow under load, add a center bracket or reduce weight. For compact storage strategies, distribute weight evenly and keep heavier items on lower shelves.
Safety note: Always wear safety glasses when drilling overhead. If installing ceiling-mounted racks, use a sturdy step ladder and have a second person help with alignment. Lag bolts into joists should penetrate at least 1.5 inches of solid wood for a secure hold. Even small spaces like bathroom shelves benefit from smart organization principles, which translate well to garage projects.
Once installed, label bins and zones to keep the system functional. A well-organized garage stays organized when every item has a designated spot. Reassess your shelving setup every year or two, garages evolve as hobbies and storage needs change.